Let’s face it, folks—a leaky faucet can drive anyone nuts. Drip… drip… drip… That annoying sound isn’t just keeping you awake at night; it’s also costing you money and wasting precious water resources. If you’ve ever wondered how to fix a leaky faucet without breaking the bank or calling a plumber, you’re in the right place. In this guide, we’ll break down everything you need to know step by step, so grab your toolkit and let’s get to work!
Fixing a leaky faucet might seem intimidating at first, but trust me, it’s not rocket science. With the right tools, some basic knowledge, and a bit of patience, you can save yourself a ton of cash and feel like a pro in no time. Whether you’re dealing with a kitchen faucet, bathroom faucet, or even an outdoor spigot, the principles are pretty much the same.
So, why wait? Let’s dive into the nitty-gritty of how to fix a leaky faucet and turn that annoying drip into a smooth, steady flow. Your wallet—and the planet—will thank you for it.
Read also:Thousandhunny Patreon Leaks The Untold Story You Need To Know
Table of Contents
- Understanding the Problem: What Causes a Leaky Faucet?
- Tools and Materials You’ll Need
- How to Diagnose the Issue
- Step-by-Step Guide: How to Fix a Leaky Faucet
- Fixing a Leaky Kitchen Faucet
- Dealing with a Leaky Bathroom Faucet
- Tackling Outdoor Faucet Leaks
- Tips to Prevent Future Leaks
- How Much Does It Cost to Fix a Leaky Faucet?
- Conclusion: Take Control of Your Plumbing
Understanding the Problem: What Causes a Leaky Faucet?
Before we jump into the solutions, it’s important to understand what’s causing the leak in the first place. A leaky faucet isn’t just a random occurrence—it’s often a sign of wear and tear or a specific issue that needs addressing. Here are the most common culprits:
- Worn-out washers or O-rings
- Corroded valve seats
- Loose parts or fittings
- Mineral buildup from hard water
- Damaged seals or gaskets
Believe it or not, most of these issues are easy to fix with a little elbow grease. But here’s the kicker: ignoring them can lead to bigger problems down the road. So, it’s better to tackle the issue sooner rather than later.
Why Should You Care About Fixing a Leaky Faucet?
Okay, I know what you’re thinking—“What’s the big deal? It’s just a little drip.” But let me break it down for you. A single leaky faucet can waste up to 3,000 gallons of water per year, which not only harms the environment but also hits your wallet hard. Plus, those pesky water stains on your sink or countertops are never fun to clean up.
Tools and Materials You’ll Need
Now that you know why fixing a leaky faucet is important, let’s talk about the tools and materials you’ll need to get the job done. Don’t worry, you don’t need to be a plumber to have these basics on hand:
- Adjustable wrench
- Phillips and flathead screwdrivers
- Plumber’s grease
- Replacement washers, O-rings, or cartridges
- Channel-type pliers
- Teflon tape
Pro tip: Always keep spare parts like washers and O-rings on hand, especially if you have older faucets. It’s like having a first-aid kit for your plumbing.
How to Diagnose the Issue
Diagnosing the problem is half the battle when it comes to fixing a leaky faucet. Here’s a quick checklist to help you figure out what’s going on:
Read also:Jackie Love Leaks The Untold Story Behind The Viral Sensation
- Turn off the water supply under the sink. If there’s no shut-off valve, you might need to turn off the main water supply.
- Check for visible damage or corrosion around the faucet base.
- Inspect the washer and O-ring inside the faucet handle. These are the usual suspects for leaks.
- Look for mineral buildup, especially if you live in an area with hard water.
If you’re still not sure what’s causing the leak, don’t sweat it. We’ll cover everything you need to know in the next section.
Common Leak Locations
Leaky faucets can happen in different places, and identifying the source is key to fixing the issue. Here are the most common areas where leaks occur:
- Around the base of the faucet
- Underneath the handle
- At the spout
- Where the faucet connects to the sink
Once you’ve pinpointed the location, you’re ready to move on to the next step.
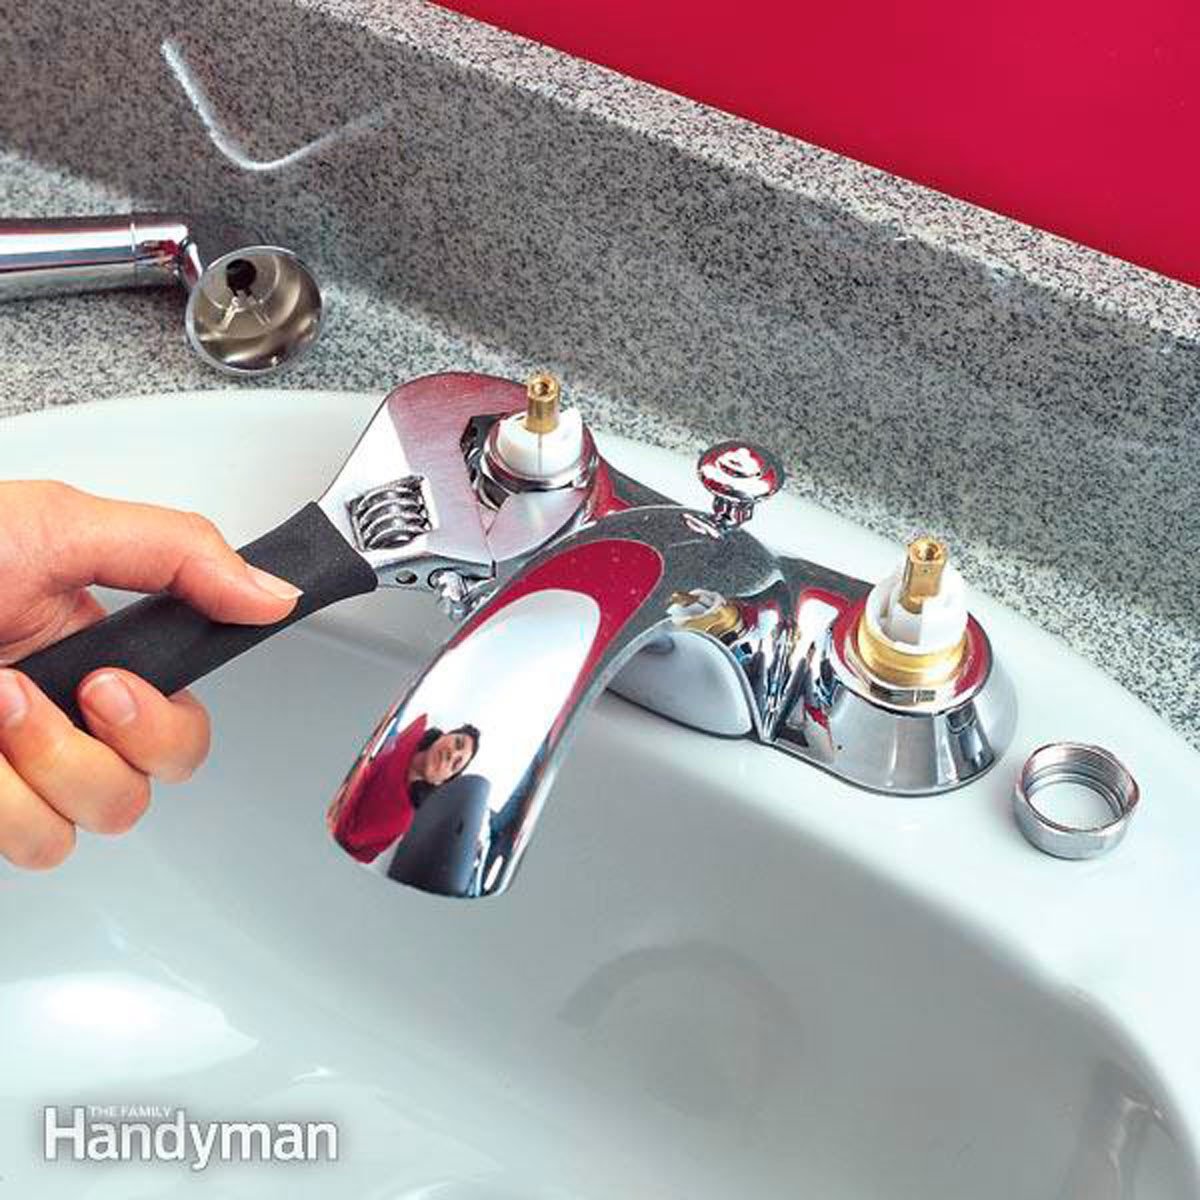
Step-by-Step Guide: How to Fix a Leaky Faucet
Alright, folks, here’s where the magic happens. Follow these simple steps to fix your leaky faucet like a pro:
- Turn off the water supply: Safety first! Make sure the water is completely off before you start tinkering with the faucet.
- Remove the handle: Use a screwdriver or Allen wrench to unscrew the handle. If it’s stuck, a little WD-40 can work wonders.
- Inspect the washer: Check the washer for wear and tear. If it’s cracked or flattened, replace it with a new one of the same size.
- Check the O-ring: Look for any signs of damage or corrosion. If it’s worn out, replace it with a matching O-ring.
- Clean the valve seat: Mineral buildup can cause leaks, so give the valve seat a good scrub with a soft brush.
- Reassemble the faucet: Put everything back together, making sure all parts are snug but not overtightened.
- Turn the water back on: Test the faucet to ensure the leak is gone. If it’s still dripping, you might need to replace the cartridge or consult a plumber.
And there you have it! With these simple steps, you’ve just saved yourself a ton of money and hassle.
What If the Leak Persists?
Let’s say you’ve followed all the steps, but the leak is still there. Don’t panic! Here are a few additional things to check:
- Make sure the new washer or O-ring is installed correctly.
- Inspect the cartridge or stem for damage. If it’s worn out, replace it.
- Check the aerator at the end of the spout for mineral buildup.
Remember, persistence is key. If all else fails, it might be time to call in the experts.
Fixing a Leaky Kitchen Faucet
Kitchen faucets are some of the hardest-working fixtures in your home, so it’s no surprise they can develop leaks over time. Here’s how to tackle a leaky kitchen faucet:
Start by identifying the type of faucet you have. Most kitchen faucets fall into one of these categories:
- Ball-type faucets
- Cartridge faucets
- Disc faucets
- Compression faucets
Each type requires slightly different steps, but the basic principles remain the same. For example, if you have a cartridge faucet, you’ll need to remove the retaining clip and pull out the cartridge for inspection.
Tips for Kitchen Faucet Maintenance
Prevention is always better than cure. Here are a few tips to keep your kitchen faucet in top shape:
- Use a soft sponge or cloth to clean the faucet regularly.
- Avoid using abrasive cleaners that can damage the finish.
- Install a water softener if you have hard water.
By taking good care of your faucet, you can extend its lifespan and avoid costly repairs.
Dealing with a Leaky Bathroom Faucet
Bathroom faucets are a bit more delicate than their kitchen counterparts, so you’ll need to tread carefully when fixing them. The good news is that the process is similar to fixing a kitchen faucet:
- Turn off the water supply and remove the handle.
- Inspect the washer and O-ring for damage.
- Check the cartridge or stem for wear and tear.
- Clean the aerator and reassemble the faucet.
One thing to keep in mind with bathroom faucets is that they often have more intricate designs, so be extra careful when removing parts. If you’re not confident, it might be worth consulting the manufacturer’s manual or seeking professional help.
Why Are Bathroom Faucets More Prone to Leaks?
Bathroom faucets are exposed to moisture and humidity on a daily basis, which can lead to corrosion and mineral buildup over time. Additionally, the constant use of hot water can cause seals to degrade faster than in other parts of the house.
Tackling Outdoor Faucet Leaks
Outdoor faucets, also known as spigots, can be a bit trickier to fix due to their exposure to the elements. Here’s how to handle leaks in your outdoor faucets:
Start by checking the packing nut at the base of the spigot. If it’s loose, tighten it gently with a wrench. If that doesn’t work, you might need to replace the washer or O-ring inside the handle.
Pro tip: Insulate your outdoor faucets during the winter months to prevent freezing and cracking.
Common Issues with Outdoor Faucets
Here are a few common issues you might encounter with outdoor faucets:
- Freezing damage during winter
- Corrosion from exposure to rain and sunlight
- Mineral deposits from hard water
Regular maintenance is key to keeping your outdoor faucets in good working order.
Tips to Prevent Future Leaks
Fixing a leaky faucet is one thing, but preventing future leaks is even better. Here are some tips to keep your faucets leak-free:
- Inspect your faucets regularly for signs of wear and tear.
- Replace washers and O-rings every few years as a preventative measure.
- Install water-saving aerators to reduce water pressure and extend the life of your faucets.
- Use a soft cloth to clean your faucets and avoid scratching the finish.
By staying proactive, you can avoid costly repairs and enjoy peace of mind knowing your plumbing is in good shape.
How Much Does It Cost to Fix a Leaky Faucet?
One of the biggest concerns people have when fixing a leaky faucet is the cost. The good news is that most DIY repairs are relatively inexpensive. Here’s a breakdown of potential costs:
- Replacement washers and O-rings: $1-$5
- Cartridges or stems: $10-$30
- Professional plumber: $50-$150 per hour
As you can see, doing it yourself can save you a ton of money. Plus, you’ll gain valuable skills that you can use for other plumbing projects around the house.
When Should You Call a Plumber?
While most faucet leaks can be fixed by a DIY enthusiast, there are times when it’s best to call in the pros. Here are a few scenarios where professional help is recommended: