There’s nothing more frustrating than the sound of a dripping faucet in the middle of the night. Fix leaky tub faucet might seem like a daunting task, but trust me, it’s not as complicated as it sounds. Whether you’re a seasoned DIY enthusiast or someone who barely knows how to use a screwdriver, this guide is here to help you out. A leaky faucet doesn’t just waste water; it can also lead to higher water bills and even damage your home over time. So, let’s dive right in and fix that pesky drip once and for all!
If you’re reading this, chances are you’ve already noticed that your tub faucet is leaking. Maybe it’s just a small drip every now and then, or maybe it’s a full-blown trickle. Either way, ignoring the problem won’t make it go away. In fact, it could get worse if left unchecked. That’s why it’s essential to take action sooner rather than later.
Now, before we get into the nitty-gritty, let’s talk about why fixing a leaky tub faucet is important. It’s not just about the annoying noise. A dripping faucet can waste up to 3,000 gallons of water per year, which is a lot of wasted resources and money. Plus, if the water is leaking onto surfaces, it can cause mold, mildew, and even structural damage. So, yeah, fixing it is definitely worth your time and effort.
Read also:Drake Leaked Picture The Untold Story Behind The Viral Sensation
Understanding the Problem: Why Is Your Tub Faucet Leaking?
Before you start messing around with tools, it’s important to understand why your tub faucet is leaking in the first place. There are several common reasons for a leaky faucet, and identifying the cause is key to fixing it properly. Here are some of the most likely culprits:
- Worn-Out O-Rings: O-rings are small rubber seals that help keep the faucet watertight. Over time, they can wear out or become brittle, causing leaks.
- Corroded Valve Seats: The valve seat is the part of the faucet where the water flows through. If it’s corroded or damaged, it can cause leaks.
- Loose Parts: Sometimes, a simple loose screw or handle can cause water to leak. Tightening these parts might be all you need to do.
- Cartridge Issues: Many modern faucets have a cartridge that controls the water flow. If the cartridge is damaged or worn out, it can lead to leaks.
Now that you know what could be causing the leak, let’s move on to the next step: gathering the tools you’ll need.
Tools and Materials You’ll Need to Fix Leaky Tub Faucet
Don’t worry, you don’t need to be a plumber to fix a leaky tub faucet. With the right tools and a bit of patience, you can tackle this job yourself. Here’s a list of tools and materials you’ll need:
- Adjustable wrench
- Phillips screwdriver
- Flathead screwdriver
- Plumbing tape
- New O-rings (if needed)
- New cartridge (if needed)
- Replacement valve seat (if needed)
Having these tools on hand will make the process much smoother. Now, let’s get to the fun part: actually fixing the faucet!
Step-by-Step Guide to Fix Leaky Tub Faucet
Step 1: Turn Off the Water Supply
The first and most important step is to turn off the water supply. You don’t want to be working with water gushing out of the faucet, trust me. Look for the shut-off valves under the sink or near the water heater. If you can’t find them, you might need to turn off the main water supply to your house.
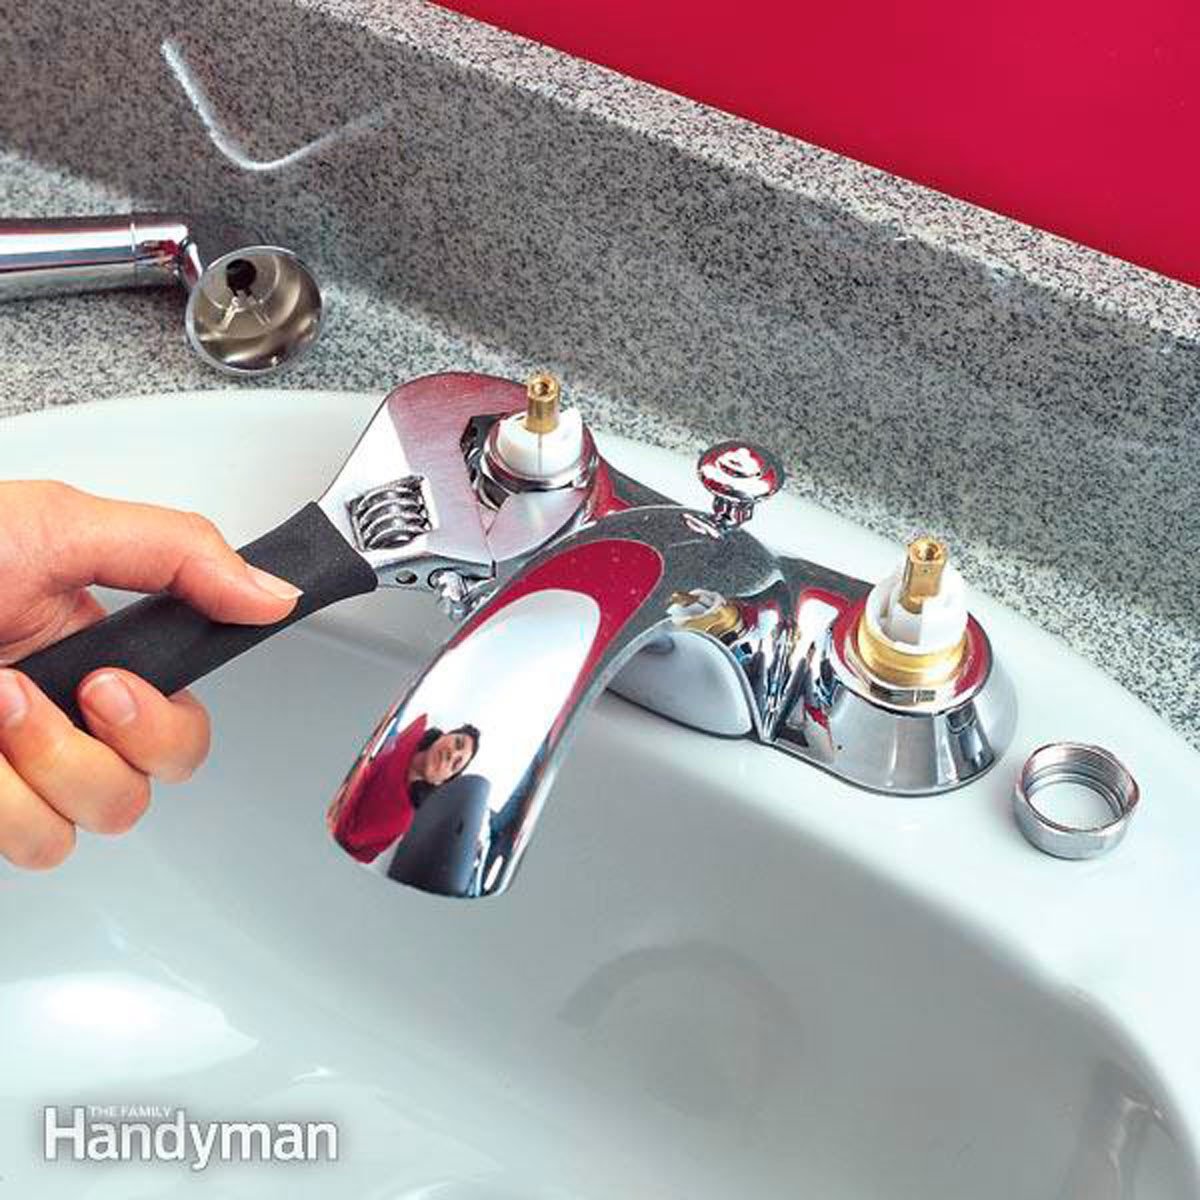
Step 2: Remove the Faucet Handle
Once the water is off, it’s time to remove the faucet handle. Most handles have a small screw or cap that you’ll need to remove first. Use a screwdriver to take it off, then gently pull the handle away from the faucet.
Read also:Meriol Chan Leak The Untold Story Behind The Viral Sensation
Step 3: Inspect the Cartridge
With the handle removed, you’ll see the cartridge inside. This is the part that controls the water flow. Check for any signs of damage or wear. If it looks worn out, you’ll need to replace it. Make sure to take the old cartridge to the hardware store to get an exact match.
Step 4: Check the O-Rings
While you’re in there, take a look at the O-rings. These small rubber seals can wear out over time, causing leaks. If they look brittle or cracked, replace them with new ones. It’s a quick and easy fix that can make a big difference.
Step 5: Reassemble the Faucet
Once you’ve replaced any damaged parts, it’s time to put everything back together. Reattach the handle, making sure everything is tight but not too tight. Then, turn the water supply back on and test the faucet to see if the leak is gone.
Voila! You’ve just fixed your leaky tub faucet. Wasn’t that easy? Now, let’s talk about some additional tips to keep your faucet in top shape.
Tips to Prevent Future Leaks
Fixing a leaky tub faucet is one thing, but preventing future leaks is another. Here are some tips to keep your faucet in good condition:
- Regular Maintenance: Check your faucet regularly for any signs of wear or leaks. A little maintenance goes a long way in preventing bigger problems down the road.
- Use Quality Parts: When replacing parts, always go for high-quality ones. Cheap parts might save you money upfront, but they’ll cost you more in the long run.
- Avoid Over-Tightening: It might seem like tightening everything as much as possible is a good idea, but it can actually cause damage. Follow the manufacturer’s instructions for the best results.
By following these tips, you’ll be able to enjoy a leak-free faucet for years to come.
Common Mistakes to Avoid When Fixing a Leaky Tub Faucet
Even the best of us make mistakes sometimes. Here are some common mistakes to avoid when fixing a leaky tub faucet:
- Not Turning Off the Water Supply: This is a rookie mistake that can lead to a big mess. Always turn off the water before you start working.
- Using the Wrong Parts: Make sure you’re using the right replacement parts for your specific faucet. Taking the old parts to the store can help ensure a perfect match.
- Over-Tightening Screws: Tightening screws too much can damage the faucet or cause leaks. Use a gentle touch and follow the instructions.
Avoiding these mistakes will make the process smoother and more successful.
DIY vs. Hiring a Plumber: Which Is Better?
Now, you might be wondering whether it’s better to fix the faucet yourself or hire a plumber. The answer depends on your skill level and the severity of the problem. If it’s a simple fix, like replacing an O-ring, DIY is definitely the way to go. However, if the problem is more complex, like a damaged valve seat, it might be worth calling in a professional.
Keep in mind that hiring a plumber can be expensive, but it can also save you time and hassle. If you’re not confident in your abilities, it’s better to leave it to the experts.
Cost of Fixing a Leaky Tub Faucet
Let’s talk about the cost of fixing a leaky tub faucet. If you’re doing it yourself, the cost will mainly be for replacement parts, which can range from a few dollars for O-rings to $20-$50 for a new cartridge. If you decide to hire a plumber, expect to pay anywhere from $100 to $300, depending on the complexity of the job and the plumber’s rates.
Considering the cost of wasted water and potential damage, fixing the faucet yourself can save you a lot of money in the long run.
Data and Statistics on Leaky Faucets
Leaky faucets are more common than you might think. According to the EPA, the average household can waste up to 10,000 gallons of water per year due to leaks. That’s enough water to fill a swimming pool! Not only does this waste water, but it also increases your water bill significantly.
In addition, a study by the Water Research Foundation found that leaks account for nearly 10% of indoor water use in homes. This highlights the importance of addressing leaks promptly to conserve water and save money.
Conclusion: Take Action and Fix That Leak!
Fixing a leaky tub faucet is a simple yet important task that can save you money and prevent damage to your home. By following the steps outlined in this guide, you can tackle the problem yourself and enjoy a leak-free faucet. Remember to check for common issues like worn-out O-rings and damaged cartridges, and don’t forget to turn off the water supply before you start.
Now that you know how to fix a leaky tub faucet, it’s time to take action. Grab your tools, gather your materials, and get to work. And when you’re done, don’t forget to share your success story in the comments below. Who knows, you might inspire others to tackle their own DIY projects!
Until next time, happy fixing!
Table of Contents
- Understanding the Problem: Why Is Your Tub Faucet Leaking?
- Tools and Materials You’ll Need to Fix Leaky Tub Faucet
- Step-by-Step Guide to Fix Leaky Tub Faucet
- Step 1: Turn Off the Water Supply
- Step 2: Remove the Faucet Handle
- Step 3: Inspect the Cartridge
- Step 4: Check the O-Rings
- Step 5: Reassemble the Faucet
- Tips to Prevent Future Leaks
- Common Mistakes to Avoid When Fixing a Leaky Tub Faucet
- DIY vs. Hiring a Plumber: Which Is Better?
- Cost of Fixing a Leaky Tub Faucet
- Data and Statistics on Leaky Faucets
- Conclusion: Take Action and Fix That Leak!