Let’s face it, folks—a leaky faucet is more than just annoying. It’s like having a broken record player in your kitchen or bathroom, constantly reminding you that something needs fixing. And if you’re here, chances are you’ve had enough of the drip-drip-drip and are ready to take matters into your own hands. Well, buckle up because we’re diving deep into the world of fixing leaky faucets, and by the end of this guide, you’ll be armed with the knowledge to silence that pesky noise for good.
Now, before we get our hands dirty, let’s talk about why fixing a leaky faucet matters. Sure, it might seem like a minor issue, but did you know that a single dripping faucet can waste up to 3,000 gallons of water per year? That’s a lot of wasted resources—and money—going down the drain. Plus, who needs the guilt of contributing to water wastage when a simple fix could save the day?
This guide isn’t just about stopping the drip; it’s about empowering you to tackle one of the most common household problems with confidence. Whether you’re a seasoned DIY enthusiast or a total newbie, we’ve got you covered. So, grab your tools, roll up your sleeves, and let’s get to work on fixing that leaky faucet!
Read also:Celebrity Photo Leaks The Inside Scoop You Need To Know
Table of Contents:
- Understanding the Problem: What Causes a Faucet to Leak?
- Gathering Your Tools: What You’ll Need to Fix a Leaky Faucet
- Diagnosing the Issue: Identifying the Type of Faucet Leak
- Step-by-Step Guide: How to Fix a Leaky Faucet
- Preventing Future Leaks: Tips for Maintaining Your Faucets
- Cost Considerations: Is Fixing a Leaky Faucet Worth It?
- Common Mistakes to Avoid When Fixing a Leaky Faucet
- Different Types of Faucets: Which One Do You Have?
- When to Call a Professional Plumber
- Conclusion: Take Control of Your Home’s Plumbing
Understanding the Problem: What Causes a Faucet to Leak?
Alright, let’s start with the basics. Why does a faucet leak in the first place? Contrary to popular belief, it’s not always because of old age or poor installation. In fact, most faucet leaks are caused by simple wear and tear—or sometimes, just a tiny part that needs replacing. Here’s a quick rundown of the most common culprits:
- Worn-out washers or O-rings
- Corroded valve seats
- Loose or damaged parts
- Mineral buildup from hard water
- Improper installation or poor-quality materials
And guess what? Most of these issues can be fixed without breaking the bank—or your back. The key is understanding the root cause of the leak, which we’ll dive into later. But for now, just know that a little bit of detective work can go a long way in solving this plumbing mystery.
Why Fixing a Leak Matters
Let’s talk numbers, people. According to the Environmental Protection Agency (EPA), the average household loses about 10,000 gallons of water each year due to leaks. That’s enough to fill a swimming pool! Not only is this a waste of precious resources, but it also adds up on your water bill. Fixing a leaky faucet isn’t just about stopping the noise—it’s about saving money and protecting the planet.
Gathering Your Tools: What You’ll Need to Fix a Leaky Faucet
Before you dive headfirst into the repair process, it’s important to gather the right tools. You don’t need a full-on toolbox to fix a leaky faucet, but having a few essentials will make the job much easier. Here’s what you’ll need:
- Adjustable wrench
- Phillips and flathead screwdrivers
- Plumber’s putty or pipe thread sealant
- New washers or O-rings (depending on your faucet type)
- A small container to catch water
- Gloves (optional, but highly recommended)
Pro tip: If you’re not sure what parts you need, take your old ones to the hardware store for a perfect match. It’s like bringing a shoe to the cobbler—makes everything easier!
Read also:Angie Varona Leaks The Untold Story You Need To Know About
Diagnosing the Issue: Identifying the Type of Faucet Leak
Now that you’ve got your tools ready, it’s time to diagnose the problem. Not all faucet leaks are created equal, so it’s important to identify the type of leak you’re dealing with. Here are the most common types:
1. Dripping from the Spout
This is the classic leak that most people think of when they hear “leaky faucet.” It’s usually caused by worn-out washers or O-rings, which can be easily replaced. Just turn off the water supply, disassemble the faucet, and replace the faulty parts. Voilà!
2. Leaking from the Base
If you notice water pooling around the base of the faucet, it could be a sign of a loose or damaged cartridge. This is more common in single-handle faucets and requires a bit more work to fix. Don’t worry—we’ll walk you through it later.
3. Leaking from the Handle
Handles that leak when turned on or off are often due to worn-out O-rings or loose screws. Tightening the screws or replacing the O-rings should do the trick. Easy peasy!
Step-by-Step Guide: How to Fix a Leaky Faucet
Alright, folks, this is the moment you’ve been waiting for. Let’s fix that leaky faucet once and for all. Follow these simple steps, and you’ll be well on your way to becoming a DIY plumbing pro:
Step 1: Turn Off the Water Supply
Before you do anything else, make sure to turn off the water supply to the faucet. Most sinks have shut-off valves underneath, but if yours doesn’t, you’ll need to turn off the main water supply to your home. Safety first, people!
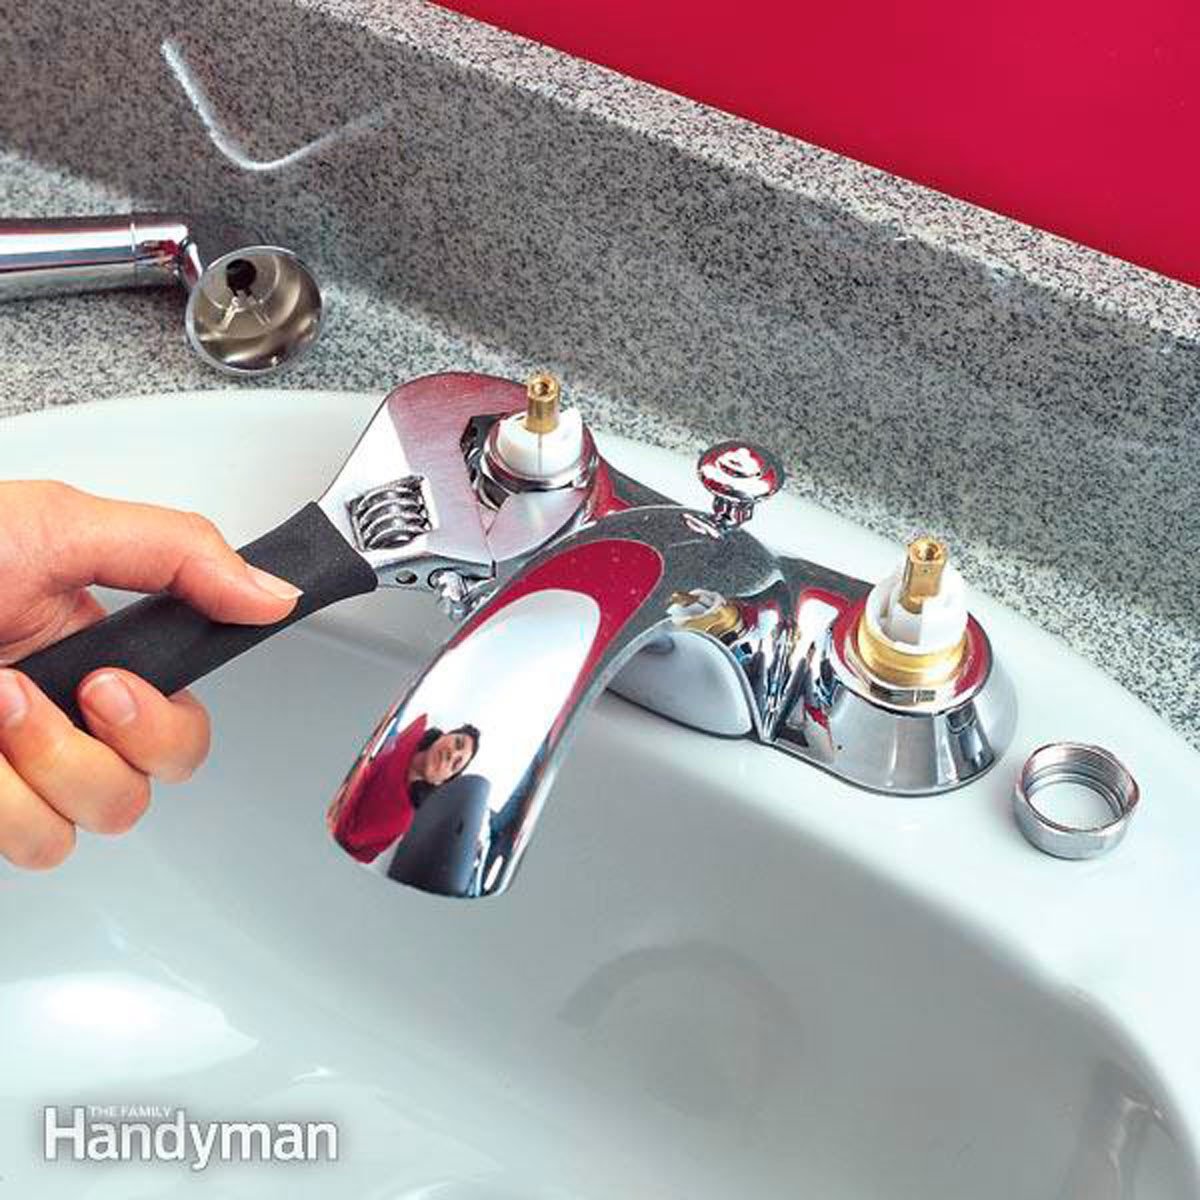
Step 2: Disassemble the Faucet
Using your trusty wrench and screwdrivers, carefully disassemble the faucet. Take note of how everything comes apart so you can put it back together later. If you’re unsure, take a quick photo or video for reference.
Step 3: Inspect and Replace Faulty Parts
Once the faucet is disassembled, inspect the washers, O-rings, and other internal parts for signs of wear and tear. Replace any damaged or worn-out components with new ones. This is where having the right parts comes in handy.
Step 4: Reassemble the Faucet
Now that you’ve replaced the faulty parts, it’s time to put everything back together. Make sure everything is tightened securely but not overtightened, as this can cause damage. Once reassembled, turn the water supply back on and test the faucet for leaks.
Preventing Future Leaks: Tips for Maintaining Your Faucets
Fixing a leaky faucet is one thing, but preventing future leaks is another. Here are a few tips to keep your faucets in tip-top shape:
- Regularly clean your faucets to remove mineral buildup
- Inspect washers and O-rings annually for signs of wear
- Avoid using excessive force when turning the faucet on or off
- Consider installing a water softener if you have hard water
By following these simple maintenance tips, you can extend the lifespan of your faucets and avoid unnecessary repairs down the road.
Cost Considerations: Is Fixing a Leaky Faucet Worth It?
Let’s talk about the elephant in the room: cost. Fixing a leaky faucet is generally an affordable DIY project, with most replacement parts costing less than $10. However, if you’re not comfortable doing it yourself, hiring a professional plumber can cost anywhere from $100 to $300, depending on the complexity of the job.
But here’s the thing: the cost of not fixing a leaky faucet can far outweigh the cost of repair. As we mentioned earlier, a single dripping faucet can waste thousands of gallons of water per year, which can add up on your water bill. Plus, ignoring the problem can lead to bigger issues down the road, like mold or water damage.
Common Mistakes to Avoid When Fixing a Leaky Faucet
Even the best of us make mistakes, but some errors can cost you time and money. Here are a few common mistakes to avoid when fixing a leaky faucet:
- Not turning off the water supply before starting
- Overtightening parts, which can cause damage
- Using the wrong replacement parts
- Skipping the inspection step and assuming the problem is solved
By being aware of these potential pitfalls, you can avoid unnecessary headaches and ensure a successful repair.
Different Types of Faucets: Which One Do You Have?
Not all faucets are created equal, and the type of faucet you have can affect how you fix it. Here’s a quick breakdown of the most common faucet types:
1. Compression Faucets
These are the old-school faucets with separate hot and cold handles. They’re easy to fix but tend to wear out faster than other types.
2. Cartridge Faucets
Found in many modern kitchens and bathrooms, cartridge faucets use a single handle to control water flow and temperature. Replacing the cartridge is usually the best solution for leaks.
3. Ball Faucets
Common in older kitchens, ball faucets use a single lever and a ball mechanism to control water flow. They require a bit more expertise to repair but are still manageable for most DIYers.
When to Call a Professional Plumber
While fixing a leaky faucet is generally a straightforward DIY project, there are times when it’s best to call in the pros. If you’ve tried everything and the leak persists, or if you’re dealing with more complex issues like damaged pipes or water damage, it’s time to seek professional help.
Remember, a licensed plumber has the expertise and tools to tackle even the toughest plumbing problems. Don’t hesitate to reach out if you’re feeling overwhelmed or unsure.
Conclusion: Take Control of Your Home’s Plumbing
And there you have it, folks—a comprehensive guide to fixing leaky faucets. Whether you’re a seasoned DIYer or a first-timer, fixing a leaky faucet is a rewarding project that can save you money and protect the environment. By understanding the cause of the leak, gathering the right tools, and following a step-by-step process, you can tackle this common household problem with confidence.
So, what are you waiting for? Grab those tools and get to work. And don’t forget to share your success story in the comments below. Who knows? You might just inspire someone else to take on their own DIY plumbing adventure. Until next time, stay dry and keep those faucets drip-free!