So, you’ve got an outside faucet leaking, huh? Don’t stress too much, my friend. It’s actually a pretty common issue that a lot of us face at some point. Whether it’s a slow drip or a steady stream, a leaking faucet can not only waste water but also lead to bigger problems down the road. The good news? Most leaks are fixable with a bit of elbow grease and the right tools. So, let’s dive into how you can tackle this problem like a pro!
You might think, “Oh, it’s just a little drip. No big deal.” But here’s the thing—those tiny drips can add up quickly. According to the EPA, the average household loses about 10,000 gallons of water annually due to leaks. That’s a lot of wasted water, and let’s not forget the impact on your water bill. Fixing a leaking faucet isn’t just about saving money; it’s also about being environmentally responsible.
Now, before we get into the nitty-gritty, let me tell you something. Fixing an outside faucet leaking isn’t rocket science. You don’t need to be a plumber to handle this. With the right information and a bit of patience, you can get it sorted in no time. So, buckle up, because we’re about to break it down step by step!
Read also:Ice Spice Nude Leak The Full Story Facts And What You Need To Know
Understanding the Outside Faucet Leaking Problem
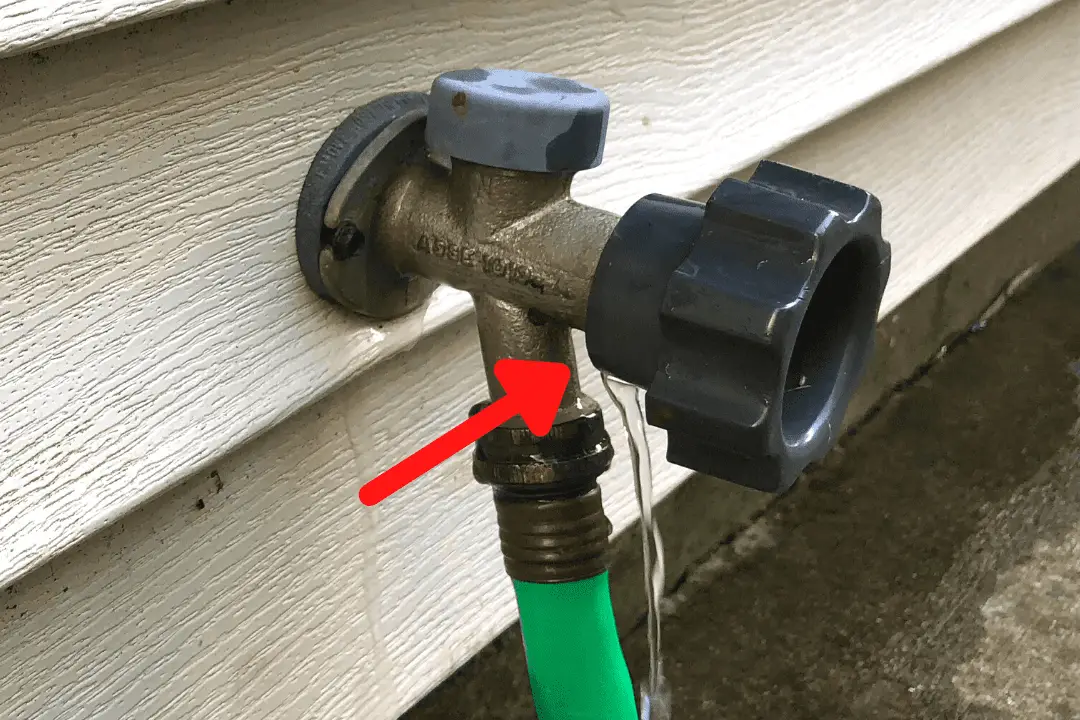
Let’s start by understanding what’s causing your outside faucet to leak. Sometimes, it’s as simple as a worn-out washer or O-ring. Other times, it could be something more serious, like a damaged valve stem or even corrosion. The first step is figuring out where the leak is coming from. Is it dripping from the spout? Or is it leaking around the handle? Identifying the source will help you determine the best course of action.
Here’s the deal: leaks don’t just happen overnight. They’re usually a sign of wear and tear over time. If you’ve noticed your outside faucet leaking, it’s probably been brewing for a while. The good news is, most leaks are easy to fix if you catch them early. So, let’s not let this problem linger, okay?
Common Causes of Outside Faucet Leaks
Now, let’s break down the most common culprits behind those pesky leaks. Here’s what you need to watch out for:
- Worn-out washers: This is one of the most common reasons for leaks. Washers can degrade over time, especially if they’re exposed to harsh weather conditions.
- Corroded O-rings: The O-ring is a small rubber ring that helps seal the faucet. If it gets damaged or worn out, you’ll start seeing leaks.
- Loose parts: Sometimes, it’s as simple as a loose nut or bolt. Tightening these parts can stop the leak in its tracks.
- Valve stem issues: The valve stem controls the flow of water. If it’s damaged or corroded, it can cause leaks.
These are just a few of the things that could be causing your outside faucet leaking problem. Don’t worry, though. Once you know what’s causing the issue, fixing it becomes a lot easier.
Tools and Materials You’ll Need
Before you dive into fixing your leaking faucet, make sure you’ve got the right tools and materials. Here’s a list of what you’ll need:
- Adjustable wrench: This will come in handy for loosening and tightening nuts and bolts.
- Flathead and Phillips screwdrivers: These will help you remove the faucet handle.
- Replacement washers and O-rings: You can pick these up at any hardware store. Make sure you get the right size for your faucet.
- Teflon tape: This is great for sealing threads and preventing leaks.
- Plumber’s grease: This helps lubricate the moving parts of the faucet.
Having the right tools makes all the difference. Trust me, trying to fix a faucet with the wrong equipment is like trying to fight a bear with a toothpick. Not ideal.
Read also:Krissy Spaulding Leaks The Untold Story You Need To Know
Where to Buy Replacement Parts
Now, you might be wondering where to get all these parts. The good news is, you can find everything you need at your local hardware store. Places like Home Depot, Lowe’s, or even smaller mom-and-pop shops will have what you’re looking for. If you’re not sure what size washer or O-ring you need, take the old one with you to the store. That way, you can get an exact match.
And if you’re feeling adventurous, you can always order parts online. Just make sure you’re buying from a reputable seller. You don’t want to end up with cheap, low-quality parts that won’t last long.
Step-by-Step Guide to Fixing an Outside Faucet Leaking
Alright, let’s get to the good stuff. Here’s a step-by-step guide to fixing your leaking faucet:
Step 1: Turn Off the Water Supply
This is crucial. The last thing you want is water spraying everywhere while you’re trying to fix the faucet. Most outside faucets have a shut-off valve nearby. If you can’t find one, you might need to turn off the main water supply to your house. Safety first, folks!
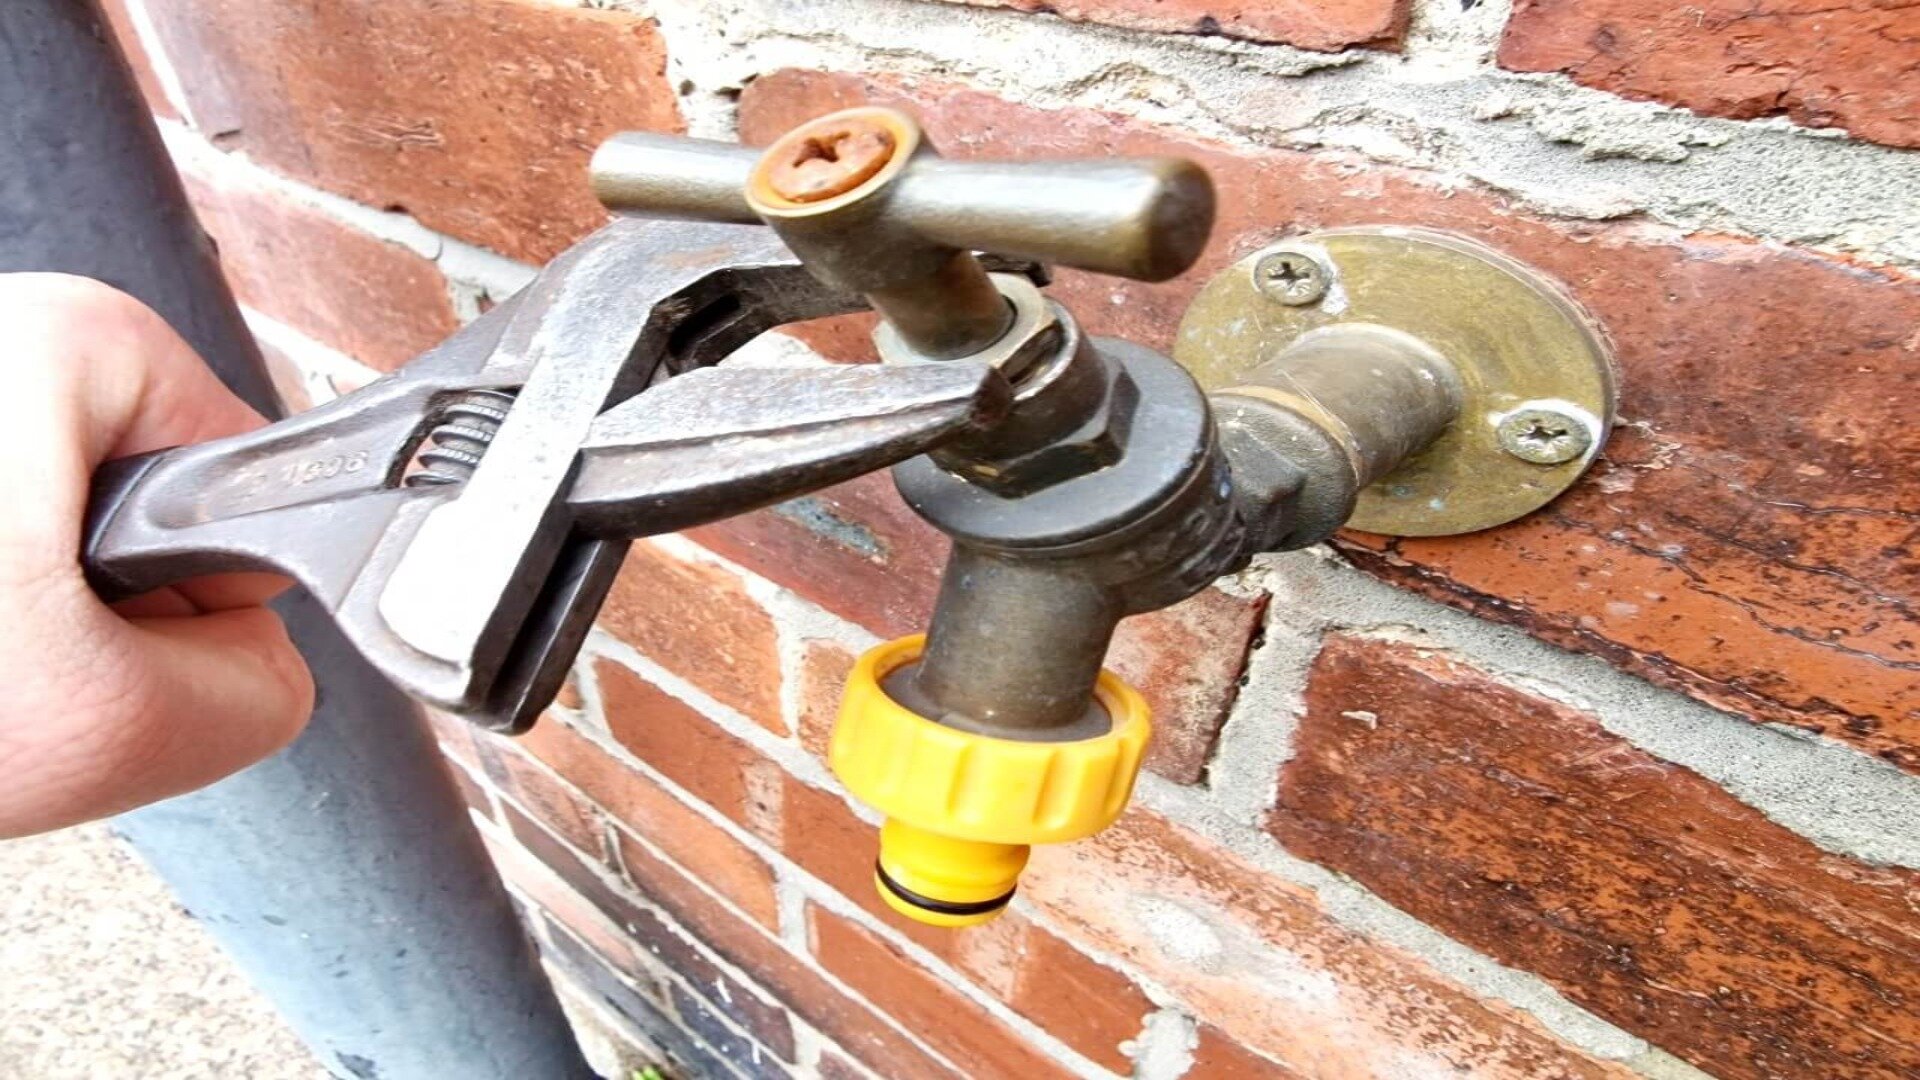
Step 2: Remove the Faucet Handle
Using your screwdriver, remove the screw that holds the handle in place. Be gentle—some screws can be pretty stubborn. Once the handle is off, you’ll have access to the inner workings of the faucet.
Step 3: Inspect the Washer and O-Ring
Take a close look at the washer and O-ring. If they look worn out or damaged, it’s time to replace them. Make sure you’ve got the right size replacements. Trust me, this is where having the old parts with you at the store comes in handy.
Step 4: Replace the Valve Stem (If Necessary)
If the washer and O-ring look fine, the issue might be with the valve stem. To replace it, you’ll need to unscrew the old one and thread in the new one. This can be a bit tricky, so take your time and make sure everything is lined up properly.
Step 5: Reassemble the Faucet
Once you’ve replaced the necessary parts, it’s time to put everything back together. Make sure everything is tight and secure. The last thing you want is for the faucet to start leaking again because of a loose nut or bolt.
Step 6: Test the Faucet
Turn the water supply back on and test the faucet. If everything’s working properly, congratulations—you’ve just saved yourself a plumber’s bill! If the leak persists, don’t panic. There might be another issue that needs addressing.
Tips for Preventing Future Leaks
Now that you’ve fixed your leaking faucet, let’s talk about how to prevent future leaks. Here are a few tips:
- Regular maintenance: Check your faucets periodically for signs of wear and tear. Replacing worn-out parts before they cause a leak can save you a lot of hassle.
- Protect from the elements: If you live in an area with harsh winters, consider insulating your outside faucets to prevent freezing and cracking.
- Use quality parts: Cheap parts might save you money in the short term, but they’ll cost you more in the long run. Invest in high-quality replacement parts for better durability.
Prevention is key. Taking care of your faucets now will save you a lot of headaches in the future.
When to Call a Plumber
Let’s face it—sometimes, DIY just doesn’t cut it. If you’ve tried everything and the leak persists, it might be time to call in a professional. Here are a few signs that it’s time to bring in the big guns:
- Persistent leaks: If the faucet keeps leaking no matter what you do, there might be a more serious issue at play.
- Corrosion: If the faucet is heavily corroded, it might be beyond repair. A plumber can assess the situation and recommend the best course of action.
- Water pressure issues: If you’re experiencing low water pressure, it could be a sign of a deeper problem that requires professional attention.
Don’t be afraid to call a plumber if you need to. Sometimes, it’s better to leave it to the experts.
Cost of Fixing an Outside Faucet Leaking
So, how much is this going to cost you? Well, that depends on a few factors. If you’re fixing the faucet yourself, the cost will be relatively low. Replacement parts like washers and O-rings are pretty cheap, usually costing just a few bucks. If you need to replace the entire faucet, you’re looking at anywhere from $20 to $100, depending on the quality and brand.
On the other hand, if you need to call a plumber, the cost can add up quickly. Most plumbers charge between $45 and $150 per hour, depending on their experience and location. So, if you can fix it yourself, it’s definitely worth the effort.
DIY vs. Hiring a Professional
Here’s a quick breakdown of the pros and cons of fixing the faucet yourself versus hiring a professional:
- DIY: Cheaper, but requires some effort and know-how.
- Professional: More expensive, but ensures the job is done right the first time.
Ultimately, the choice is yours. If you’re handy around the house, DIY might be the way to go. But if you’re not confident in your skills, it’s better to leave it to the experts.
Conclusion: Take Action Today!
So, there you have it—a comprehensive guide to fixing an outside faucet leaking. Whether it’s a worn-out washer, a corroded O-ring, or a damaged valve stem, most leaks are fixable with a bit of effort and the right tools. Remember, catching leaks early can save you a lot of money and hassle in the long run.
Now, it’s your turn to take action. Don’t let that leaky faucet waste another drop of water. Grab your tools, follow the steps, and get that faucet fixed. And if you need more help, feel free to leave a comment or share this article with your friends. Let’s all do our part to conserve water and keep our homes in top shape!
Table of Contents
- Understanding the Outside Faucet Leaking Problem
- Common Causes of Outside Faucet Leaks
- Tools and Materials You’ll Need
- Where to Buy Replacement Parts
- Step-by-Step Guide to Fixing an Outside Faucet Leaking
- Tips for Preventing Future Leaks
- When to Call a Plumber
- Cost of Fixing an Outside Faucet Leaking
- DIY vs. Hiring a Professional
- Conclusion: Take Action Today!