Nothing ruins the vibe of your kitchen or bathroom like the constant drip of a leaking faucet. It's annoying, wasteful, and honestly, it can drive you insane if left unchecked. But guess what? Fixing a leaking faucet isn’t as hard as you think. With the right tools, a bit of patience, and this guide, you’ll be stopping that drip in no time. So, let’s dive right in and learn how to fix a leaking faucet like a true DIY champ!
Before we get our hands dirty, it’s worth noting that a leaking faucet isn’t just an inconvenience—it’s also costing you money. Did you know that a single dripping faucet can waste up to 3,000 gallons of water per year? That’s a lot of wasted resources and cash flying out the window. Fixing it early can save you big bucks and help the planet at the same time.
Now, if you’re reading this, chances are you’re either dealing with a leaky faucet or want to prevent one. Either way, you’re in the right place. This guide will walk you through everything you need to know about leaking faucet repair, from identifying the problem to fixing it like a pro. Let’s get started!
Read also:Rae Rockhold Leaked The Untold Story Behind The Viral Phenomenon
Table of Contents
- Why Fix a Leaking Faucet?
- Common Causes of Leaking Faucets
- Tools You’ll Need for Leaking Faucet Repair
- Step-by-Step Guide to Fix a Leaking Faucet
- DIY Tips for Preventing Future Leaks
- When to Call a Plumber
- Cost Considerations for Leaking Faucet Repair
- The Environmental Impact of Leaking Faucets
- FAQs About Leaking Faucet Repair
- Final Thoughts
Why Fix a Leaking Faucet?
Let’s face it—a leaking faucet is more than just a nuisance. It’s a sign that something’s not right with your plumbing system. Ignoring it won’t make the problem go away; in fact, it’ll only get worse over time. Here’s why fixing a leaking faucet should be at the top of your to-do list:
- Water Waste: A leaky faucet can waste thousands of gallons of water annually. That’s not just bad for your wallet—it’s bad for the environment too.
- Higher Water Bills: Every drop counts, and those extra drips add up on your utility bill. Fixing the leak can save you hundreds of dollars a year.
- Prevent Damage: Water damage is no joke. A small leak can lead to bigger problems, like mold growth, rotting wood, or even structural damage if left unchecked.
Now that you know why fixing a leaking faucet is important, let’s look at some common causes behind this pesky problem.
Common Causes of Leaking Faucets
Not all leaks are created equal. Depending on the type of faucet you have, there are several reasons why it might be leaking. Here are the most common culprits:
Worn-Out Washers
Washers are the rubber or plastic discs inside your faucet that create a seal when the water is turned off. Over time, these washers can wear out, leading to leaks. Replacing them is usually a quick fix.
Loose Parts
Sometimes, all it takes is tightening a few screws or nuts to stop a leak. Loose parts can cause water to seep out, so make sure everything is snug.
Corrosion and Mineral Build-Up
Hard water can leave mineral deposits inside your faucet, causing blockages and leaks. Regular cleaning can help prevent this issue.
Read also:Renee Winter Leak The Untold Story Behind The Scenes
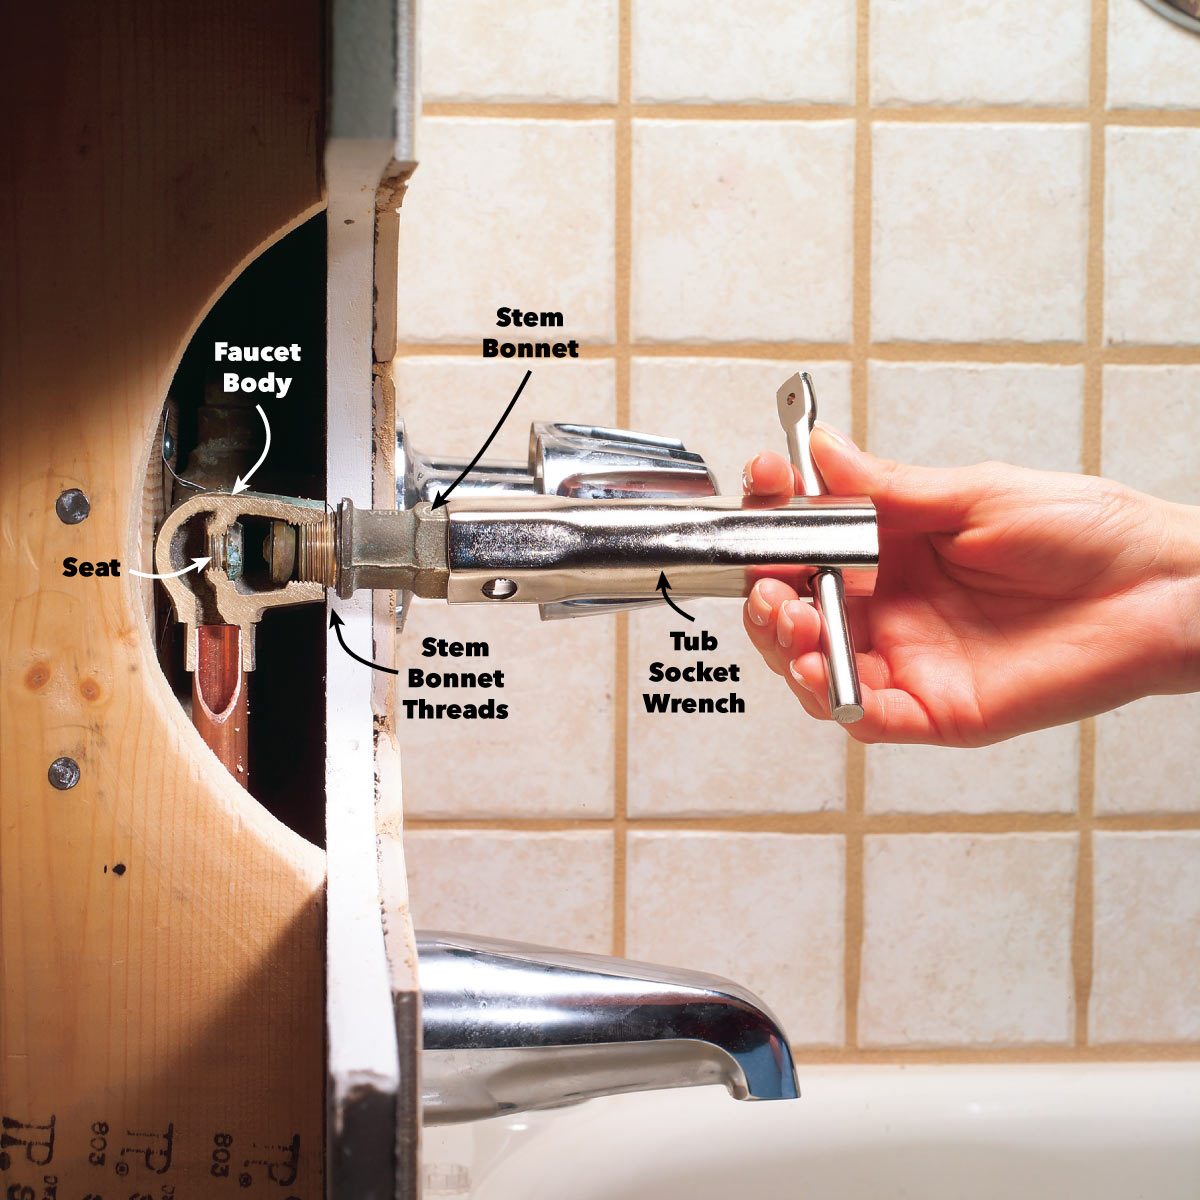
Tools You’ll Need for Leaking Faucet Repair
Before you start tinkering with your faucet, make sure you have the right tools. You don’t need a fancy toolkit to fix a leaking faucet—just the basics will do. Here’s what you’ll need:
- Adjustable wrench
- Phillips and flathead screwdrivers
- Plumber’s tape
- Replacement parts (washers, O-rings, etc.)
- Bucket or bowl to catch water
- Towel or rag
Having these tools on hand will make the repair process smoother and faster. Trust me, you don’t want to run to the hardware store halfway through the job!
Step-by-Step Guide to Fix a Leaking Faucet
Ready to tackle that leak? Follow these steps, and you’ll have your faucet back in working order in no time.
Step 1: Turn Off the Water Supply
Safety first! Before you start disassembling your faucet, turn off the water supply. You’ll usually find a shut-off valve under the sink. If there isn’t one, you may need to turn off the main water supply to your home.
Step 2: Remove the Faucet Handle
Use a screwdriver to remove the handle. Some faucets have a decorative cap that hides the screw—just pop it off with a flathead screwdriver.
Step 3: Inspect and Replace the Washer
Once the handle is off, you’ll see the stem. Unscrew it to expose the washer at the bottom. If the washer is worn out or damaged, replace it with a new one that matches the size.
Step 4: Check the O-Ring
If the leak is coming from the base of the faucet, the O-ring might be the culprit. Remove it and inspect for cracks or wear. Replace it if necessary.
Step 5: Reassemble the Faucet
Put everything back together in reverse order. Tighten all parts securely, but don’t overdo it—you don’t want to strip the threads.
Step 6: Test the Faucet
Turn the water supply back on and test the faucet. If the leak is gone, congrats—you’ve just saved yourself a ton of money and hassle!
DIY Tips for Preventing Future Leaks
Fixing a leaking faucet is great, but preventing future leaks is even better. Here are some tips to keep your faucets in tip-top shape:
- Regularly clean your faucets to remove mineral deposits.
- Inspect your faucets periodically for signs of wear and tear.
- Use plumber’s tape on threads to create a better seal.
- Avoid overtightening the faucet handle—it can damage the internal parts.
By following these simple tips, you can extend the life of your faucets and avoid costly repairs down the road.
When to Call a Plumber
Not all faucet problems can be solved with a DIY approach. If you’ve tried everything and the leak persists, it might be time to call in the professionals. Here are some signs that it’s time to bring in a plumber:
- The leak is coming from multiple areas.
- You can’t identify the source of the leak.
- The faucet is old and needs to be replaced entirely.
Remember, a plumber can save you time and money in the long run by addressing the root cause of the problem.
Cost Considerations for Leaking Faucet Repair
One of the biggest concerns people have about leaking faucet repair is the cost. While DIY repairs are usually inexpensive, hiring a plumber can add up quickly. Here’s a breakdown of the costs involved:
DIY Costs
Replacing washers, O-rings, and other small parts typically costs between $5 and $20. Add in the cost of tools if you don’t already own them, and you’re still looking at a pretty affordable solution.
Plumber Costs
Hiring a plumber can cost anywhere from $100 to $300, depending on the complexity of the job and the plumber’s hourly rate. However, if the leak is causing significant damage, it might be worth the investment.
The Environmental Impact of Leaking Faucets
We’ve already talked about how leaking faucets waste water and money, but let’s not forget the environmental impact. Every drop of water wasted is a drop that could be used for something more important, like drinking or irrigation. By fixing your leaking faucet, you’re doing your part to conserve water and protect our planet.
FAQs About Leaking Faucet Repair
Got questions? Here are some of the most frequently asked questions about leaking faucet repair:
How long does it take to fix a leaking faucet?
Most repairs can be done in under an hour, depending on the complexity of the issue.
Can I fix a leaking faucet myself?
Absolutely! With the right tools and a bit of patience, most people can fix a leaking faucet without professional help.
What if the leak keeps coming back?
If the leak persists after multiple attempts to fix it, it might be time to call a plumber. There could be an underlying issue that requires professional attention.
Final Thoughts
Fixing a leaking faucet might seem intimidating at first, but with this guide, you now have all the knowledge and tools you need to tackle the job like a pro. Remember, a little bit of maintenance can go a long way in preventing future leaks and saving you money. So, roll up your sleeves, grab your tools, and get to work!
And hey, if you found this guide helpful, don’t forget to share it with your friends and family. Who knows? You might just inspire someone else to take on their own DIY plumbing adventure. Until next time, happy fixing!

:max_bytes(150000):strip_icc()/repair-a-leaking-freeze-proof-faucet-2718898-08-0043b53c1f864ec29b5c281edf9c7540.jpg)