Have you ever woken up in the morning, ready to start your day, only to find a puddle of water under your sink? If your garbage disposal leaking from bottom has become a recurring issue, it’s time to take action. This common kitchen nightmare can turn into a major hassle if left unchecked. Don’t panic just yet—we’ve got you covered with practical solutions and expert advice!
Dealing with a leaking garbage disposal is not only frustrating but also potentially damaging to your home. Water damage from leaks can lead to mold, mildew, and even structural issues over time. So, what exactly causes this problem? And more importantly, how do you fix it? Let’s dive in and explore everything you need to know about garbage disposal leaks.
From understanding the root cause to identifying the right tools for repair, this article will walk you through every step of the process. Whether you’re a DIY enthusiast or someone who prefers calling in the pros, we’ve got all the info you need to make an informed decision. Let’s get started!
Read also:Scarlett Johansson Nude Leaks The Truth Behind The Controversy
Table of Contents
- What is Garbage Disposal Leaking?
- Common Causes of Garbage Disposal Leaks
- Signs to Look Out For
- Tools You Need to Fix the Leak
- Step-by-Step Guide to Fixing the Leak
- When to Call a Professional
- Preventing Future Leaks
- Cost Considerations
- Frequently Asked Questions
- Conclusion
What is Garbage Disposal Leaking?
Let’s start with the basics. A garbage disposal leaking from bottom is essentially water seeping out from the bottom or sides of the unit. This can happen due to various reasons, ranging from loose connections to internal damage. While it might seem like a minor issue at first, ignoring it can lead to bigger problems down the line.
Garbage disposals are designed to handle food waste and prevent clogs in your plumbing system. However, they’re not invincible. Over time, wear and tear can cause leaks, and if not addressed promptly, these leaks can compromise the functionality of your disposal unit.
Why Should You Care?
Leaking disposals don’t just waste water; they can also damage your kitchen cabinets, flooring, and even the structure of your home. Mold and mildew growth is another concern, especially if the area under your sink isn’t well-ventilated. So, yeah, fixing that leak ASAP is kinda a big deal.
Common Causes of Garbage Disposal Leaks
Now that we’ve established why leaks are a problem, let’s talk about what causes them. There are several reasons why your garbage disposal might be leaking from the bottom. Here’s a quick rundown:
- Loose Connections: The mounting hardware or pipes connected to the disposal might have come loose over time.
- Worn Gaskets: The rubber gasket that seals the disposal unit can wear out, leading to leaks.
- Cracked Disposal Unit: Physical damage to the disposal, such as cracks, can cause water to escape.
- Clogged Drain: A blockage in the drain line can cause water to back up and leak from the disposal.
- Improper Installation: If the disposal wasn’t installed correctly, it might develop leaks sooner rather than later.
Understanding the cause of the leak is crucial to fixing it effectively. Don’t assume it’s just a minor issue—take the time to diagnose the problem properly.
Signs to Look Out For
How do you know if your garbage disposal is leaking from the bottom? Here are some telltale signs to watch out for:
Read also:Ski Bri Leaks The Ultimate Guide To Understanding The Controversy And Its Impact
- Water pooling under the sink after using the disposal.
- Musty or moldy smells emanating from the area.
- Wet or damp cabinets near the disposal unit.
- Visible water stains or rust on the bottom of the disposal.
- Odd noises when running the disposal, such as gurgling or bubbling sounds.
If you notice any of these signs, it’s time to investigate further. Early detection can save you a lot of trouble and expense in the long run.
Tools You Need to Fix the Leak
Before you dive into fixing the leak, make sure you have the right tools. Here’s a list of essentials:
- Adjustable wrench
- Plumber’s putty
- Screwdriver (Phillips and flathead)
- Bucket or bowl (to catch water)
- Gasket replacement kit (if needed)
- Towel or rag (for cleaning up)
Having these tools on hand will make the repair process smoother and more efficient. Plus, you’ll feel like a pro while doing it!
Tips for Preparation
Before you start tinkering with your disposal, turn off the power at the breaker box. Safety first, folks! Also, ensure the sink is empty and dry to avoid any unnecessary splashes or messes.
Step-by-Step Guide to Fixing the Leak
Now that you’re all set with the tools and preparation, let’s get down to business. Here’s a step-by-step guide to fixing your garbage disposal leak:
Step 1: Inspect the Area
Take a close look at the disposal unit to identify where the water is coming from. Is it the bottom, sides, or connections? This will help you determine the best course of action.
Step 2: Tighten Loose Connections
Use your wrench to tighten any loose pipes or mounting hardware. Sometimes, a simple adjustment can solve the problem.
Step 3: Replace the Gasket
If the gasket is worn out, it’s time for a replacement. Remove the old gasket and install a new one, ensuring a snug fit. Apply plumber’s putty around the edges for extra security.
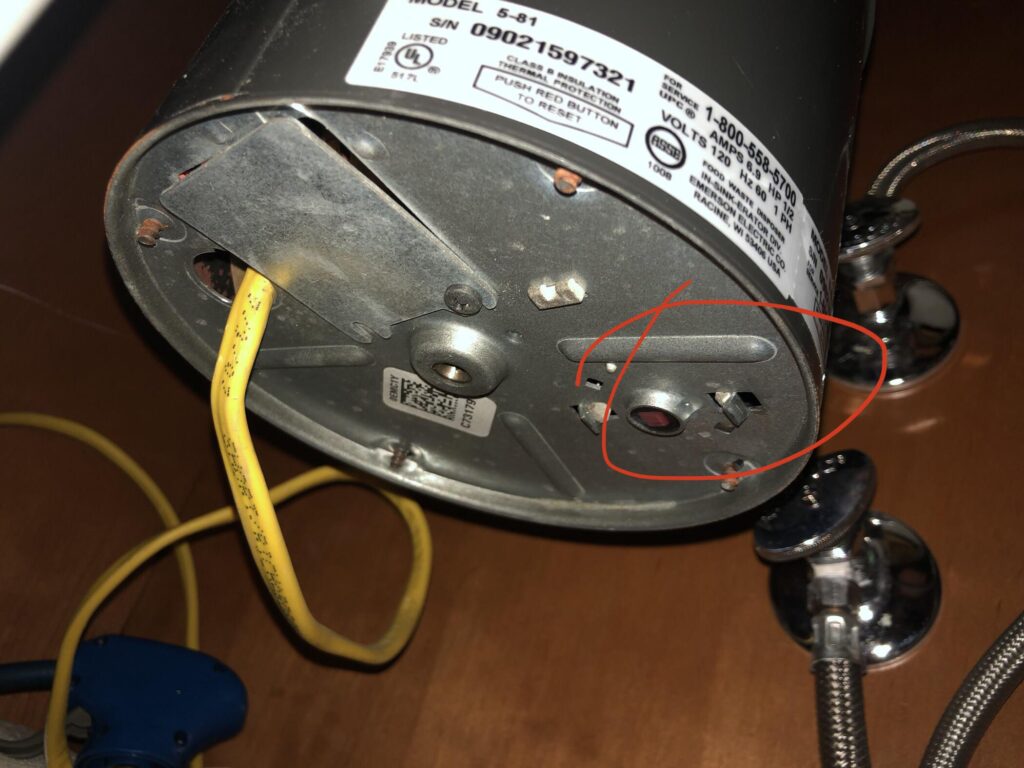
Step 4: Check for Cracks
Inspect the disposal unit for any visible cracks or damage. If you find any, you might need to replace the entire unit. Sorry, but some things just can’t be fixed.
Step 5: Test the Disposal
Once you’ve made the necessary repairs, turn the power back on and run the disposal to test for leaks. If everything looks good, congrats—you’ve fixed the issue!
When to Call a Professional
Not all leaks are DIY-friendly. If you’ve tried fixing the problem and it persists, or if the damage is extensive, it’s time to call in a professional plumber. They have the expertise and equipment to handle complex repairs and ensure your disposal is functioning properly.
How to Find the Right Plumber
Look for licensed and insured plumbers with good reviews. Ask for recommendations from friends or family, and don’t hesitate to get multiple quotes before making a decision.
Preventing Future Leaks
Prevention is always better than cure. Here are some tips to help you avoid future leaks:
- Regularly clean your garbage disposal to prevent clogs.
- Inspect the unit periodically for signs of wear and tear.
- Avoid putting hard or fibrous foods down the disposal.
- Run cold water while using the disposal to flush out food particles.
- Consider upgrading to a newer, more efficient model if your current one is outdated.
By following these tips, you can extend the lifespan of your garbage disposal and minimize the risk of leaks.
Cost Considerations
Fixing a leaking garbage disposal doesn’t have to break the bank. The cost will depend on the severity of the issue and whether you choose to DIY or hire a professional. Here’s a rough estimate:
- DIY repairs: $20–$100 (for parts and tools)
- Professional repair: $100–$300 (depending on the plumber and location)
- Disposal replacement: $200–$500 (including installation)
Keep in mind that investing in quality repairs or upgrades can save you money in the long run by reducing the likelihood of future issues.
Frequently Asked Questions
Q: Can I use duct tape to fix a garbage disposal leak?
A: Not really. Duct tape might provide a temporary fix, but it’s not a permanent solution. Addressing the root cause of the leak is the only way to ensure it doesn’t happen again.
Q: How often should I clean my garbage disposal?
A: It’s a good idea to clean your disposal once a week. Use a mixture of baking soda and vinegar for a natural and effective cleaning solution.
Q: Is it safe to pour bleach down the disposal?
A: Nope! Bleach can damage the disposal unit and harm your plumbing system. Stick to safer cleaning methods.
Conclusion
Dealing with a garbage disposal leaking from bottom doesn’t have to be a nightmare. With the right knowledge and tools, you can tackle the problem head-on and keep your kitchen running smoothly. Remember to identify the cause of the leak, take appropriate action, and maintain your disposal regularly to prevent future issues.
We hope this guide has been helpful in addressing your concerns about garbage disposal leaks. If you’ve found this article useful, feel free to share it with others who might benefit from it. And hey, if you’ve got any questions or tips of your own, drop them in the comments below—we’d love to hear from you!