Are you losing coolant faster than you can say "car trouble"? Well, you’re not alone. Radiator leaks are one of the most common issues that drivers face, and if left unchecked, they can lead to some serious engine damage. But don’t panic yet! Fixing a coolant leak from your radiator isn’t as daunting as it might seem. With the right tools, a bit of patience, and this step-by-step guide, you’ll be back on the road in no time. So buckle up, and let’s dive into the world of radiator repairs!
Now, before we get too far ahead of ourselves, it’s important to understand why your radiator might be leaking in the first place. Coolant leaks can happen due to a variety of reasons, from corrosion and cracks to loose fittings or damaged hoses. Whatever the cause, ignoring the problem is never a good idea. A leaking radiator can lead to overheating, which, trust us, is something you want to avoid at all costs.
But hey, the good news is that many radiator leaks can be fixed without breaking the bank. Whether you’re a seasoned mechanic or just someone who’s trying to save a buck or two, this guide will walk you through everything you need to know about diagnosing and repairing coolant leaks. So, let’s get started!
Read also:James Charles Twitter Leak The Inside Scoop You Need To Know
Table of Contents
- Understanding Coolant Leaks
- Common Causes of Coolant Leaks
- Diagnosing the Problem
- Tools You Need
- Step-by-Step Guide to Fixing a Radiator Leak
- Preventive Maintenance
- When to Replace the Radiator
- Cost Considerations
- Professional Help
- Conclusion
Understanding Coolant Leaks
Let’s start with the basics. Your car’s radiator plays a crucial role in keeping your engine cool and running smoothly. It circulates coolant through the engine and dissipates heat to prevent overheating. But when there’s a leak, the coolant level drops, and that’s when trouble begins.
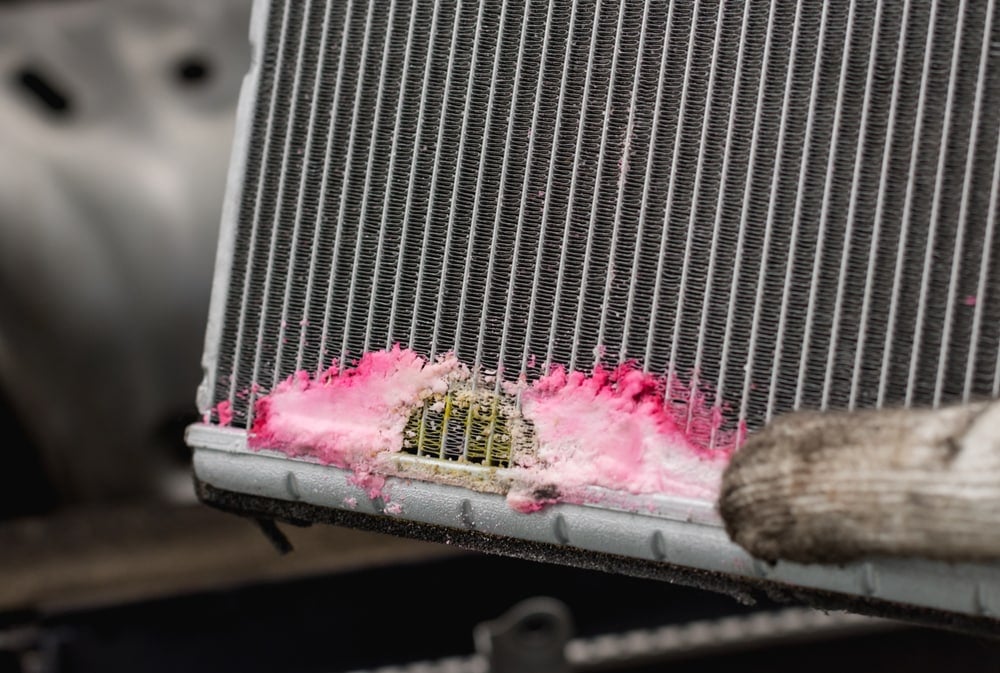
So, what exactly is a coolant leak? Simply put, it’s any instance where coolant escapes from the cooling system. This could be due to a crack in the radiator, a damaged hose, or even a loose connection. And while small leaks might seem harmless, they can quickly escalate into bigger problems if not addressed promptly.
Signs of a Coolant Leak
Here are some common signs that your radiator might be leaking:
- Puddles of green, orange, or blue liquid under your car (that’s coolant, folks!)
- A sweet, syrupy smell coming from your engine bay
- Overheating warnings on your dashboard
- Low coolant levels in the reservoir tank
These symptoms might not always scream "radiator leak," but they’re definitely worth investigating. Ignoring them could lead to costly repairs down the road.
Common Causes of Coolant Leaks
Now that we know what a coolant leak looks like, let’s talk about why it happens in the first place. There are several potential culprits behind radiator leaks, and understanding them can help you prevent future issues.
Corrosion and Rust
Over time, radiators can develop rust and corrosion, especially if you’re not using the right type of coolant or if you live in a humid climate. This can lead to tiny pinholes or cracks that allow coolant to escape.
Read also:The Sabrina Banks Onlyfans Leak What You Need To Know
Cracked Radiator
A cracked radiator is another common cause of leaks. This can happen due to physical damage, poor maintenance, or even extreme temperature changes. If your radiator has a visible crack, it’s time to take action.
Loose or Damaged Hoses
Radiator hoses are responsible for carrying coolant between the engine and the radiator. If these hoses become loose or damaged, they can cause leaks. Regular inspections can help catch these issues early.
Diagnosing the Problem
Before you start fixing anything, it’s important to diagnose the issue correctly. Here’s how you can identify the source of your coolant leak:
First, check the radiator itself for any visible cracks or corrosion. Then, inspect the hoses and connections for signs of wear and tear. If you’re still unsure, you can use a pressure tester to check for leaks in the cooling system. This tool is relatively inexpensive and can save you a lot of guesswork.
Visual Inspection Tips
- Look for stains or residue around the radiator and hoses
- Check for loose or damaged clamps
- Inspect the radiator cap for proper sealing
Remember, a thorough inspection is key to identifying the root cause of the problem. Don’t rush this step—it could save you time and money in the long run.
Tools You Need
Got your diagnosis? Great! Now it’s time to gather your tools. Here’s a list of essentials you’ll need to fix a coolant leak:
- Radiator sealant (for minor leaks)
- Replacement hoses and clamps
- A wrench set
- A pressure tester
- New coolant (make sure it’s compatible with your vehicle)
Having the right tools on hand will make the repair process smoother and more efficient. Plus, it’ll give you that satisfying "DIY mechanic" vibe.
Step-by-Step Guide to Fixing a Radiator Leak
Alright, let’s get our hands dirty! Here’s a step-by-step guide to fixing a coolant leak from your radiator:
Step 1: Drain the Coolant
Before you do anything else, make sure your engine is cool and turned off. Then, locate the drain plug on the bottom of the radiator and drain the old coolant into a container. This is important for both safety and environmental reasons.
Step 2: Inspect and Repair
Now that the radiator is empty, take a closer look at the source of the leak. If it’s a minor crack, you can try using a radiator sealant. For larger issues, you may need to replace parts like hoses or the radiator itself.
Step 3: Refill the System
Once the repair is complete, refill the radiator with fresh coolant. Make sure to follow your vehicle’s recommended coolant type and mixture ratio. Then, start the engine and check for leaks.
Step 4: Test Drive
Take your car for a short drive to ensure everything’s working properly. Keep an eye on the temperature gauge and listen for any unusual noises. If everything checks out, congratulations—you’ve just fixed a radiator leak!
Preventive Maintenance
Prevention is always better than cure, right? Here are some tips to help you avoid radiator leaks in the future:
- Regularly check your coolant levels and top them up as needed
- Inspect hoses and clamps during routine maintenance
- Use high-quality coolant and follow the manufacturer’s recommendations
- Consider upgrading to a more durable radiator if you live in harsh conditions
By staying on top of maintenance, you can extend the life of your radiator and avoid costly repairs.
When to Replace the Radiator
Not all radiator leaks can be fixed with a simple repair. Sometimes, the radiator itself needs to be replaced. Here are some signs that it’s time for a new one:
- Recurring leaks despite repairs
- Significant corrosion or damage
- Poor cooling performance
Replacing a radiator might seem like a big job, but with the right guidance, it’s definitely doable. Just make sure you choose a quality replacement part that matches your vehicle’s specifications.
Cost Considerations
Fixing a radiator leak doesn’t have to break the bank, but the cost can vary depending on the severity of the issue. Here’s a rough breakdown:
- Radiator sealant: $10-$20
- Hoses and clamps: $20-$50
- Radiator replacement: $200-$500 (parts and labor)
Remember, catching leaks early can save you a ton of money in the long run. So, don’t hesitate to address issues as soon as you notice them.
Professional Help
While many radiator leaks can be fixed at home, there are times when it’s best to leave the job to the professionals. If you’re dealing with a complex issue or don’t have the necessary tools and experience, consider taking your car to a trusted mechanic.
Look for a shop with a good reputation and certified technicians. They’ll be able to diagnose and repair the problem quickly and efficiently, giving you peace of mind.
Conclusion
Fixing a coolant leak from your radiator might seem intimidating at first, but with the right knowledge and tools, it’s a task that most drivers can tackle themselves. By understanding the causes, diagnosing the problem, and following a step-by-step guide, you can save yourself time, money, and a lot of hassle.
Remember, preventive maintenance is key to avoiding future issues. Regular inspections and proper care can go a long way in keeping your radiator in top condition. And if you ever feel unsure, don’t hesitate to seek professional help.
So, what are you waiting for? Grab those tools, roll up your sleeves, and get to work! And when you’re done, don’t forget to share your success story in the comments below. Who knows, you might just inspire someone else to take on their own radiator repair project!